In this article you will come know following things:
l What is Email Templates?
l How to send email through Asp.Net WebForm?
l Step By Step Implementation of Sending Email By Email Templates in Asp.Net WebFom.
What is Email Templates?
Email templates is predefined body of text of email message. Sending email just filling the blank fields.
Example:
NewUserName is blank field and will replace with Actual data like “Ashish / Suhana Kalla”.
Dear [NewUserName] (this text in email templates)
Dear Ashish / Suhana Kalla (While sending system will replace the NewUserName with Actual User Name)
How to send email through Asp.Net WebForm?
We can send Email through coding thats codebehind. For this following things required :
1. Email Account: In this article we had used GMAIL accounts.
2. Email Account SMTP Detail.
3. Code of Email Sending: In dot net framework there is two namespace System.Net, System.Net.Mail reuired.
using System.Net;
using System.Net.Mail;
System.Net namespace used for set NetworkCredential in below image you can see.
 |
| Asp Net Email Training Institute Malad East |
System.Net.Mail namespace used for classes called “MailMessage” and “SMTP”
In image you can see MailMessage dedicated for sending email message using SMTP client.
 |
| Asp Net Email Training Institute Goregoan East |
In image you can see detail of SmtpClient.
 |
| Asp Net Email Training Institute Jogeshwari East |
Code Explanation:
Base class for sending email
MailMessage _mailmsg = new MailMessage();
Make TRUE because our body text is html
_mailmsg.IsBodyHtml = true;
Set From Email ID
_mailmsg.From = new MailAddress(emailSender);
Set To Email ID
_mailmsg.To.Add(txtUserName.Text.ToString());
Set Subject
_mailmsg.Subject = subject;
Set Body Text of Email
_mailmsg.Body = MailText;
Now set your SMTP
SmtpClient _smtp = new SmtpClient();
Set HOST server SMTP detail
_smtp.Host = emailSenderHost;
Set PORT number of SMTP
_smtp.Port = emailSenderPort;
Set SSL --> True / False
_smtp.EnableSsl = emailIsSSL;
Set Sender UserEmailID, Password
NetworkCredential _network = new NetworkCredential(emailSender, emailSenderPassword);
_smtp.Credentials = _network;
Send Method will send your MailMessage create above.
_smtp.Send(_mailmsg);
As per best practice in this article following things fetched from Web.Config file:
1. Sender Email ID
2. Password
3. SMTP server detail.
4. Port Number
5. IsSSL value.
For complete code you can see Signup.aspx.cs file.
Step By Step Implementation of Sending Email By Email Templates in Asp.Net WebFom:
For this task we go through following 7 steps:
1. Create Asp.Net Empty Web Site Project.
2. Insert New HTML File named ”SignUp.html”
3. Write the content for SignUp.html (Code of HTML)
4. Free webmail Gmail / Yahoo account and SMTP Settings required.
5. Web.Config updation with SMTP setting.
6. Insert an new WebForm file.
7. Write code to shoot email using email template called Signup.html.
Now we go step by step as per above points in simplify way, that's more easy to learn.
Start Visual Studio, I am using Visual Studio 2015 Community Edition.
STEP 1
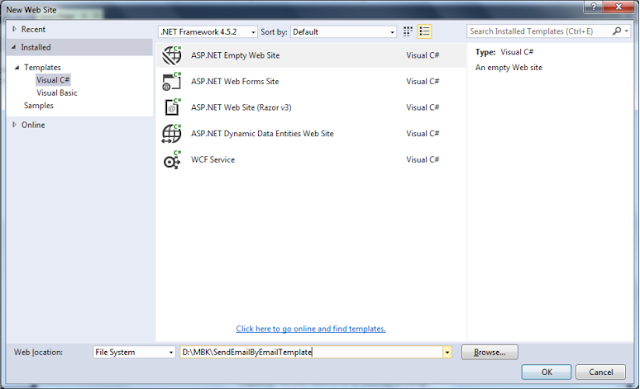
Create a new Project by clicking on FILE --> WebSite
In below image you see I had used Asp.Net Empty Web Site
 |
| Asp Net Email Training Institute Andheri East |
STEP 2
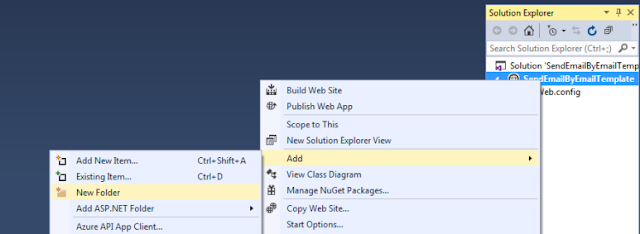
Create a new folder called “EmailTemplates” you create a new folder by right click on project title in Solution explorer.
By right click you can see below give image select NEW FOLDER after that one folder comes your project rename to “EmailTemplates”.
 |
| Asp Net Email Training Institute Vileparle East |
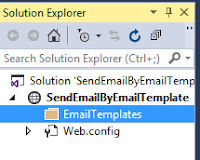
After taking above step your solution explorer look like this:
 |
| Asp Net Email Training Institute Santacruz East |
Now select EmailTemplates folder and insert a new HTML file inside folder. To insert a new html file you have to again right click on project and select Add New Item.
 |
| Asp Net Email Training Institute Khar East |
Select HTML Page and give name “SignUp.html”.
 |
| Asp Net Email Training Institute Bandra East |
In SignUp.Html file we will set basic body text of email which shoot / execute while new user register / signup on portal / site.
In signup email we will send user’s User Name. In signup mail mostly peoples are saying thank you for signup and link for login again.
Code in SignUp.html
<!DOCTYPE html>
<html>
<head>
<title></title>
<meta charset="utf-8" />
<style>
table, th, td {
border: 1px solid black;
}
</style>
</head>
<body>
<br />
<table width="50%">
<tr>
<td align="center" style="background-color:yellow">
<span style="font-size:25px;"> Welcome To C# Corner </span>
<br />
<br />
</td>
</tr>
<tr align="center">
<td>
<br />
<br />
Dear [newusername]
<br />
<br />
Thank you for registering with us!
<br />
<a href="http://www.c-sharpcorner.com">
Click here to Login
</a>
Regards,
<br />
<br />
</td>
</tr>
<tr>
<td align="center" style="background-color:yellow">
<br />
<br />
<span style="font-size:15px;text-decoration:underline"> Share your knowledge </span>
<br />
<span style="font-size:20px;"> <i>If you have knowledge, let others light their candles in it - Margaret Fuller </span>
<br />
<br />
</td>
</tr>
</tr>
</table>
</body>
</html>
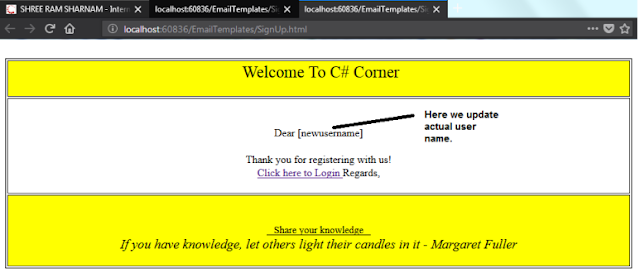
Email Template Output look like:
 |
| Asp Net Email Training Institute Mahim East |
STEP 3
Sending through Gmail Account:
Email Account : <Your Gmail Account>
Password: <Your Gmail Account Password>
SMTP Detail: smtp.gmail.com
(SMTP stand for Simple Mail Transfer Protocol)
Port Detail: 587
Note: If you want to send mail through shared hosting or other domain. Above things are required.
STEP 4
Updation of Web.Config file:
As per best practice we should always store settings kind of things into Web.Config file.
Now we are going to store settings of gmail/yahoo account into web.config file.
Code in Web.Config file
<?xml version="1.0"?>
<!--
For more information on how to configure your ASP.NET application, please visit
http://go.microsoft.com/fwlink/?LinkId=169433
-->
<configuration>
<appSettings>
<add key="smtp" value="smtp.gmail.com"/>
<add key="portnumber" value="587"/>
<add key="username" value="xyz@gmail.com"/>
<add key="password" value="abc@123"/>
<add key="IsSSL" value="true"/>
</appSettings>
<system.web>
<compilation debug="true" targetFramework="4.5.2" />
<httpRuntime targetFramework="4.5.2" />
</system.web>
</configuration>
STEP 5
To insert a new web form file you have to again right click on project and select Add New Item.
 |
| Asp Net Email Training Institute Matunga East |
Insert an new WebForm file named “Signup.aspx”
In signup.aspx there are only three(3) server side controls.
1. TextBox used for USER NAME.
2. TextBox used for PASSWORD.
3. Button used for SUBMIT
Code in Signup.aspx file
<%@ Page Language="C#" AutoEventWireup="true" CodeFile="Signup.aspx.cs" Inherits="Signup" %>
<!DOCTYPE html>
<html xmlns="http://www.w3.org/1999/xhtml">
<head runat="server">
<title></title>
<style type="text/css">
.auto-style1 {
height: 30px;
}
</style>
</head>
<body>
<form id="form1" runat="server">
<div>
<h3>New User (Signup)</h3>
<table>
<tr>
<td>User Name<br />
(Email ID)
</td>
<td>
<asp:TextBox ID="txtUserName" runat="server" Width="200px"></asp:TextBox>
</td>
</tr>
<tr>
<td>
<br />
Password
</td>
<td>
<br />
<asp:TextBox ID="txtPassword" runat="server" TextMode="Password" Width="200px"> </asp:TextBox>
</td>
</tr>
<tr>
<td colspan="2" class="auto-style1">
<asp:Button ID="btnSubmit" runat="server" Text="Register (Signup)" OnClick="btnSubmit_Click" />
</td>
</tr>
</table>
</div>
</form>
</body>
</html>
Code in Signup.aspx.cs file
using System;
using System.Collections.Generic;
using System.Linq;
using System.Web;
using System.Web.UI;
using System.Web.UI.WebControls;
//System.Net
using System.Net;
//System.Net.Mail namespace required to send mail.
using System.Net.Mail;
using System.Configuration;
using System.IO;
public partial class Signup : System.Web.UI.Page
{
protected void Page_Load(object sender, EventArgs e)
{
}
protected void btnSubmit_Click(object sender, EventArgs e)
{
//Fetching Settings from WEB.CONFIG file.
string emailSender = ConfigurationManager.AppSettings["emailsender"].ToString();
string emailSenderPassword = ConfigurationManager.AppSettings["password"].ToString();
string emailSenderHost = ConfigurationManager.AppSettings["smtpserver"].ToString();
int emailSenderPort = Convert.ToInt16(ConfigurationManager.AppSettings["portnumber"]);
Boolean emailIsSSL = Convert.ToBoolean(ConfigurationManager.AppSettings["IsSSL"]);
//Fetching Email Body Text from EmailTemplate File.
string FilePath = "D:\\MBK\\SendEmailByEmailTemplate\\EmailTemplates\\SignUp.html";
StreamReader str = new StreamReader(FilePath);
string MailText = str.ReadToEnd();
str.Close();
//Repalce [newusername] = signup user name
MailText = MailText.Replace("[newusername]", txtUserName.Text.Trim());
string subject = "Welcome to CSharpCorner.Com";
//Base class for sending email
MailMessage _mailmsg = new MailMessage();
//Make TRUE because our body text is html
_mailmsg.IsBodyHtml = true;
//Set From Email ID
_mailmsg.From = new MailAddress(emailSender);
//Set To Email ID
_mailmsg.To.Add(txtUserName.Text.ToString());
//Set Subject
_mailmsg.Subject = subject;
//Set Body Text of Email
_mailmsg.Body = MailText;
//Now set your SMTP
SmtpClient _smtp = new SmtpClient();
//Set HOST server SMTP detail
_smtp.Host = emailSenderHost;
//Set PORT number of SMTP
_smtp.Port = emailSenderPort;
//Set SSL --> True / False
_smtp.EnableSsl = emailIsSSL;
//Set Sender UserEmailID, Password
NetworkCredential _network = new NetworkCredential(emailSender, emailSenderPassword);
_smtp.Credentials = _network;
//Send Method will send your MailMessage create above.
_smtp.Send(_mailmsg);
}
}
Page Output :
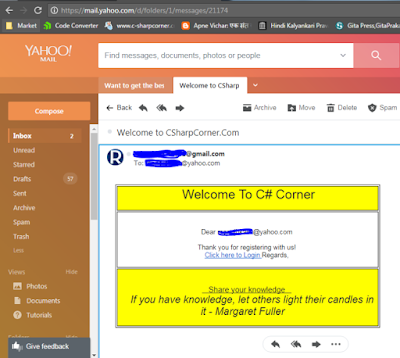
After clicking on REGISTER(SIGNUP) welcome (SIgnup) )maill will goes to xxxxxx@yahoo.com
Yahoo.com account’s Mail Screen Shot: Mail reached at destination
 |
| Asp.Net Email Training Institute Prabhadevi Elphinstone East |
Enjoy and Happy Coding….
I provide personalized training through home tuition or online on Dot Net (.Net) , Asp.Net [WebForm / MVC], WCF, WPF, WebService, Windows Application, Console Application.
If you liked this post, I’d be very grateful if you’d help it spread by emailing it to a friend, or sharing it on Twitter or Facebook or Google+.
Leave a comment that starts a conversation.
Thank you!

No comments:
Post a Comment